Aplikasi Android Terbaru Hidroponik Untuk Pemula

Hidroponik merupakan teknik menanam tanpa menggunakan tanah sebagai sumber unsur hara yang menunjang pertumbuhan tanaman. Pada sistem hidroponik, sumber dari unsur hara di sediakan dengan media air, dengan kata lain, pertanian dengan metode hidroponik merupakan bertanam dengan menitik beratkan kepada pemberian unsur hara secara optimal dengan media air. Dengan demikian pertumbuhan tanaman akan menjadi optimal.
Di era modern sekarang ini banyak kemanjuan di berbagai bidang, misalnya bidang telekomunikasi. Sekarang semua orang mempunyai smartphone android yang tidak hanya berfungsi sebagai media komunikasi seperti sms dan telfon. Begitu juga di perkotaan, gedung-gedung, perumahan berkembang sangat pesat namun dengan konsekuensi berkurangnya lahan hijau atau lahan pertanian. Dengan kondisi seperti sekarang ini perlu mencari solusi agar pertanian tidak menghilang di bumi ini karena tidak bisa di bayangkan jika tanaman di bumi ini punah, bumi juga akan punah.
Salah satu solusi terbaik adalah mengenalkan pertanian dengan metode hidroponik. Hidroponik tidak membutuhkan lahan yang luas, maka dari itu pertanian dengan metode ini perlu di perkenalkan ke masyarakat khususnya di daerah perkotaan mengingat lahan pertanian semakin berkurang.
Maka kini hadir aplikasi berbasis android terbaru untuk memperkenalkan pertanian dengan metode hidroponik untuk pemula. Aplikasi ini bisa anda unduh di playstore dengan nama "Pengenalan Bertanam Hidroponik" atau bisa di unduh di sini
Oke mari kita ulas aplikasi ini.


Tampilan aplikasi saat pertama kali di buka.


Halaman menu utama, di sini terdapat berbagai tombol menu diantaranya adalah :
  1. Tombol Menu Quotes Hidroponik Hari Ini yang terdapat pada pojok kiri sebalah atas, jika tombol ini  ditekan maka akan keluar Quotes tentang fakta-fakta hidroponik. Quotes ini akan keluar secara acak setiap kali tombol ini ditekan. Ini diharapkan akan memberi pengetahuan tentang hidroponik. 
  2. Tombol Info yang terdapat pada pojok kanan atas, jika tombol ini ditekan akan menampilkan informasi si pembuat.
  3. Tombol Close "X" yang terdapat pada pojok kanan bawah, tombol ini berfungsi untuk keluar dari aplikasi.
  4. Tombol Hidroponik, jika tombol ini di tekan akan mucul sub menu seperti gambar di bawah ini. Tombol "Pengertian Hidroponik " berisi tentang pengertian hidroponik secara umum dan pengertian jenis-jenis media tanaman yang sering digunakan seperti, rockwoll, arang sekam dan sebagainya. Pada tombol " Kelebihan dan kekurangan " berisi tentang kelebihan dan kekurangan sistem hidroponik menurut ahli. Pada tombol " Sistem Hidroponik " berisi tentang penjelasan tentang sistem hidroponik dan macam-macamnya. Kemudian yang terakhir adalah tombol "Artikel Hidroponik " berisi tentang artikel hidroponik online dari berbagai sumber.


  5. Tombol Tips dan Trik berisi tentang tutorial-tutorial yang dapat di contoh untuk memulai berhidroponik khususnya untuk pemula.


  6. Tombol " Alat Bantu ", tombol ini berisi tentang penjelasan alat-alat bantu standar dalam berhidroponik seperti, TDS & EC Meter, pH Meter dan Pompa Aquarium.
  7. Tombol "pH dan ppm ", tombol ini berisi tabel EC, ppm dan pH kebutuhan sayuran hidroponik yang sering di tanam dan terdapat trik untuk mengukur EC atau ppm tanpa alat bantu TDS&EC Meter.
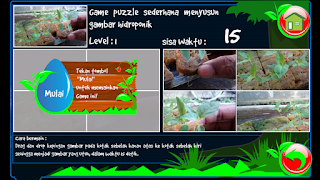
  8. Tombol " Simulasi " berisi tentang simulasi cara menyemai benih dan cara membuat larutan stok abmix yang di kemas sedemikian rupa dengan sistem drag dan drop. Serta di lengkapi dengan Game Puzzle sederhana yang tersedia secara acak setiap levelnya, hal ini bertujuan menghindari permainan yang sama di setiap levelnya.


Itulah penjelasan singkat tentang aplikasi ini. Aplikasi ini dapat diunduh dengan gratis di playstore dengan nama " Pengenalan Bertanam Hidriponik " atau bisa di unduh di sini. Aplikasi ini 100% GRATIS dan tidak di sisipi iklan apapun. Karena aplikasi ini dalam tahap pengembangan, mohon partisipasinya dari anda untuk mengisi kuesioner tentang aplikasi ini di sini. Saya berharap aplikasi ini bermanfaat bagi orang banyak. Terimakasih.

*NB
Terimakasih untuk pemilik Web/blog yang saya gunakan untuk sumber di menu "Artikel HIdroponik " Semoga artikel-artikel anda bermanfaat bagi banyak orang dan dapat menjadi sumber pahala untuk anda. Saya tidak mendapat keuntungan apapun dari aplikasi ini kecuali untuk menjadi project akhir Study saya, dan saya berharap aplikasi ini bisa bermanfaat untuk orang banyak.


Video Hidroponics With Bottles


Hydroponic systems, which grow plants without soil, accelerate plant growth by bringing the nutrients directly to the plants, so they don’t have to develop large root systems to seek out food. All plants will grow more quickly under these conditions, but some plants do so well that they can go from seed to harvest in just a few weeks. If you are new to hydroponics, don’t be afraid to try different plants to see which ones grow best for you.

Many common greens will grow much faster in a hydroponic system than they will when grown in soil. Arugula, a slightly peppery salad green, is ready to harvest as little as three weeks after planting. Mustard greens, Swiss chard, spinach, kale and watercress are all fast-growing plants that will thrive in a hydroponic system, and typically you can begin harvesting them within a month of planting. Harvest them early, when they are small, to get tender young greens, or allow them to get larger if you prefer your greens to have more size or a stronger flavor.

The most commonly produced salad green plants which are easily grown in hydroponics systems alongside lettuce are listed below. Many are grown for their appearance or color while others such as rocket, corn salad, and various types of cress are grown more for their distinctive flavors. Most of these plants are highly productive and withstand harvesting of a few leaves (always harvest the outer leaves from salad green crops) every week while continuing to grow.

Hidroponics With Bottles Part 1


 Hidroponics With Bottles Part2


    Chicory and Endive: Mediterranean salad plants - The most common type of Italian chicory produced hydroponically is radicchio which has a sharp, tangy flavor and is red and white in coloring. Endive salad greens have tender, finely divided and curled leaves that look great in salad mixes.
  •     Kale: Red and Green varieties are available - smaller leaves are used in salads, larger leaves as garnishes or decoration.
  •     Mustard Greens: Small, quick growing varieties are suitable for salad greens, they add a tangy flavour and come in both red and green types.
  •     Mizuna: Very quick growing in hydroponics, Mizuna is a commonly grown Japanese green. Grows into a large clump of finely dissected leaves which can be harvest from many times.
  •     Cresses: Water cress, land cress, winter cress and common cress are very easy to grow and produce at a rapid rate in hydroponic systems. Cresses have a distinctive peppery flavor and can be added to many salad types or used on their own as a vegetable. Watercress is a semi aquatic plant and can be grown from seed or cuttings and is particularly well suited to NFT, raft, float and similar systems.
  •     Rocket (Arugula): Rocket, sometimes called Arugula, roquette or rucola, is an ancient medicinal plant which is now becoming a very popular salad green crop. Both annual and perennial forms can be grown in hydroponics. The leaves have a distinctive nutty, peppery flavor that some say is reminiscent of peanuts. The flavor can be strong in older plants and those which are flowering (rocket flowers are also edible and can be used in salads).
  •     Chard: Baby leaves of Swiss chard (red, orange yellow, white and green) are commonly grown and used in salad mixes as they add a distinctive splash of color. Harvest young from hydroponic systems before any strong flavors develop.
  •     Spinach: Baby spinach leaves used raw in salads should be used as older plants can become bitter. Orache or mountain spinach (Artiplex hortensis) is also a useful plant as it comes in green, red and yellow varieties and is more easily grown in hydroponics than common spinach.
  •     Corn salad (Lambs lettuce): A plant that certainly looks like a small, hairy weed - but corn salad has a distinctive flavor (nutty, sharp and a little corn like) which blends in well in salad mixes.
  •     Miner's Lettuce: Grown more for its unusual leaf shape and crisp texture, Miner's Lettuce is an incredibly fast grower in hydroponics. Miners lettuce isn't actually a lettuce, its a member of the Portulacaceae family and is also called winter purslane. It formed a valuable part of the diet of miners (hence its common name) during the gold rush of the 1850s, helping prevent scurvy in times when fresh vegetables were scare. This is an annual plant, grown from seed.
  •     Amaranth: Several members of the Amaranthus are used as leafy salad plants. Both red and green amaranth are heat tolerant and good for summer conditions. The flavor is similar to spinach and most need to be harvested while still quite young for use in salad mixes.
These are just a few of the wide range of salad green plants which thrive in hydroponic systems. Keeping a regular check on seed catalogues is a good idea to see what the latest and greatest new salad green plant is!

The Scrap Window Greenhouse For Hydroponics


A greenhouse (also called a glasshouse, or, if with additional heating, a hothouse) is a structure with walls and roof made chiefly of transparent material such as glass in which plants requiring regulated climatic conditions are grown. These structures range in size from small sheds to industrial-sized buildings. A miniature greenhouse is known as a cold frame. The interior of a greenhouse exposed to sunlight becomes significantly warmer than the external ambient temperature, protecting its contents in cold weather.

Many commercial glass greenhouses or hothouses are high tech production facilities for vegetables or flowers. The glass greenhouses are filled with equipment including screening installations, heating, cooling, lighting, and may be controlled by a computer to optimise conditions for plant growth.

Greenhouses can be divided into glass greenhouses and plastic greenhouses.

In domestic greenhouses the glass used is typically 3mm (or 1/8") 'horticultural glass' grade, which is good quality glass that should not contain air bubbles (which can produce scorching on leaves by acting like lenses).
Plastics mostly used are polyethylene film and multiwall sheets of polycarbonate material, or PMMA acrylic glass.

Commercial glass greenhouses are often high-tech production facilities for vegetables or flowers. The glass greenhouses are filled with equipment such as screening installations, heating, cooling and lighting, and may be automatically controlled by a computer.

  • Scrap window greenhouse


This kind of project just requires you to make the most of the old and unwanted window frames that are lying in your junkyard. Simply make the basic wooden structure (foundation) and with the help of screws adjust and assemble the windows on it. You can add tin roofing and add glass to the windows which have broken ones. Simply add flowers to it so that beauty can be enhanced. 

In Cooming Search

Burung Kicau, Burung Kontes, Suara Burung Kicau mp3, Suara Burung Gacor mp3, Memancaing Burung Liar Dengan Sura Burung Kicau mp3. Burung Kacer, Burung Cucak Ijo, Burung Kenari, Burung Sirto, Cipoh, Sirtu,Suara Burung Branjangan mp3, Suara Masteran Burung Kicau.

US, UK, California, India, Rusia, Australia, Florida, Miami, France, Canada, Netherland, Hongkong, Japan, Sweden, New Ziland, Singapore, Sout Africa, Taiwan, Austria, Sout Korea, Montreal, Quebec, Queensland, Brisbane, Amsterdam, Wan Chai, Tokyo, China, Stockholm, Nacka, Mumbai, Maharashtra, Auckland, Manchester, Nevada, Las Vegas, Johannesburg, Malaysia, Kuala Lumpur, Taipe

Hydroponic, Hydroponics System, Gardening, Urban Farm, Indor Farm, Green House

How To Grow Tomatoes and Mustard Green With Hydroponics Tehnique

https://www.youtube.com/watch?v=dURhe0Qpsgc

Imagine that first bite of a sweet, succulent, ripe tomato picked fresh from your garden. The warm juice runs down your chin as a delightful explosion of flavour awakens dormant tastebuds. In our harsh climate, fresh tomatoes can usually be enjoyed for only a few short weeks of the year. Then it's back to artificially ripened, flavourless imports your grocer charges a small fortune for. Take heart, you can savour the homegrown tomato experience year round.

Tomatoes grown hydroponically, indoors under lights, are equal to, or superior in flavour and nutrition than their outdoor, soil grown counter-parts. A tomato's sweetness and flavour is largely dependent on light and temperature. The nutritional value of a tomato is dependent on the nutrition the plant receives while growing and producing fruit. In the controlled environment of an indoor garden, the plants exact requirements can be met with artificial lighting, temperature control and supplemental nutrition. This enables the grower to enjoy a continuous harvest all year long without sacrificing taste and goodness.

https://www.youtube.com/watch?v=20GoS5Y_J50


Hydroponics is a pure, clean method of cultivation. For this reason it is recommended you start your tomatoes directly from seed. Bringing plants in from outside creates a potential for pest and disease contamination. Start seeds in one inch rockwool starter cubes in a standard nursery tray with dome. Rockwool cubes should be pre-soaked in water adjusted to a pH of 4.5 prior to planting. Keep covered tray in a moist, warm (20°-25°C) environment until seedlings begin to sprout. Once vegetation appears, immediately move the seedling into a light source, metal halide or flourescent lights, for at least 12 hours per day and remove domes. Failure to provide light soon enough will cause seedlings to bolt in search of a light source. Ensure roots are never exposed to the light as this will cause damage and death to the roots and delay plant growth.

Hydroponics Technique For Gardening


Hydroponics is a subset of hydroculture and is a method of growing plants using mineral nutrient solutions, in water, without soil. Terrestrial plants may be grown with their roots in the mineral nutrient solution only, or in an inert medium, such as perlite or gravel.

Basically, growing plants without the use of a traditional dirt medium and using a nutrient rich water solution. Those mediums range from fiberglass to sand and from fired clay balls to nothing at all. Several branches of hyrdoponics include aeroponics (using air as the grow medium), aquaponics etc.
Hydroponically grown foods not only taste better and are more nutritional, you can change the properties of your food, monitor what goes into your food and pollutes less. You can also grow more in less space. 
This is especially great for those of us that do not have a backyard to grow in. With the right plant selection, you can also keep pests away. I plan on planting a citronella plant - not only do I like the smell of citronella plants, but their oils keep away mosquitoes and other pests.

There are 6 basic types of hydroponic systems; Wick, Water Culture, Ebb and Flow (Flood & Drain), Drip (recovery or non-recovery), N.F.T. (Nutrient Film Technique) and Aeroponic. There are hundreds of variations on these basic types of systems, but all hydroponic methods are a variation (or combination) of these six. Scroll down this page (or click on the system names) to see drawings and a description of each type of hydroponic system.

  • WICK SYSTEM


Wick Systems are the most basic form of hydroponics and are incredibly easy to set up. They are a great introduction for beginners or students looking to learn the basic principles of hydroponics without having to deal with the complex mechanisms of other systems.

Wick Systems are passive, meaning they have no moving parts. This makes them easier and cheaper to maintain than active systems such as Ebb and Flow, but they also have the drawback of being less efficient and not well equipped for high-maintenance plants, or large plants that consume a lot of water. The best plants to use in this system are fast growing lettuces or herbs. Herbs such as rosemary that don’t require a lot of water such are the best choices, while thirsty plants such as tomatoes would not do well.


  • WATER CULTURE


The water culture system is the simplest of all active hydroponic systems. The platform that holds the plants is usually made of Styrofoam and floats directly on the nutrient solution. An air pump supplies air to the air stone that bubbles the nutrient solution and supplies oxygen to the roots of the plants.

Water culture is the system of choice for growing leaf lettuce, which are fast growing water loving plants, making them an ideal choice for this type of hydroponic system. Very few plants other than lettuce will do well in this type of system.

This type of hydroponic system is great for the classroom and is popular with teachers. A very inexpensive system can be made out of an old aquarium or other water tight container. We have free plans and instructions for a simply water culture system (click here for free plans).

The biggest draw back of this kind of system is that it doesn't work well with large plants or with long-term plants.

 
  • EBB & FLOW - (FLOOD AND DRAIN)

 
Flood and Drain (Ebb and Flow) systems are very popular with home hydroponic growers for many reasons. Besides how easy they are for anyone to build, you can use almost any materials you have laying around to build them with, so you don't need to spend much money to grow plants  hydroponically. Also they can be built to fit in any available space you might have (both indoors or outdoors), and there is no limit to the different and imaginative ways to design them for that space. Along with being inexpensive and easy to build, plants grow very well in flood and drain systems. The flood and drain system works basically like it sounds, by simply flooding the plants root system with nutrient solution. Only periodically rather than continuously.

How a hydroponic flood and drain system operates quite simple. The main part of the flood and drain system holds the containers the plants are growing in. It can be just one plant, or many plants/containers in series. A timer turns on the pump, and water (nutrient solution) is pumped through tubing from the reservoir up into the main part of the system using a submersible fountain/pond pump. The nutrient solution continues to fill (flood) the system until it reaches the height of the preset overflow tube so that it soaks the plants roots. The overflow tube should be set to about 2 inches below the top of the growing media.

When the water filling/flooding the system reaches the overflow tube height, it drains back down to the reservoir where it recirculates back through the system again. The overflow tube sets the water level height in the flood and drain system, as well as makes sure the water (nutrient solution) doesn't spill out the top of the system while the pump is on. When the pump shuts off, the water siphons back down into the reservoir through the pump (draining the system). 

  • DRIP SYSTEMS
RECOVERY / NON-RECOVERY


Drip systems are probably the most widely used type of hydroponic system in the world. Operation is simple, a timer controls a submersed pump. The timer turns the pump on and nutrient solution is dripped onto the base of each plant by a small drip line. In a Recovery Drip System the excess nutrient solution that runs off is collected back in the reservoir for re-use. The Non-Recovery System does not collect the run off.

A recovery system uses nutrient solution a bit more efficiently, as excess solution is reused, this also allows for the use of a more inexpensive timer because a recovery system doesn't require precise control of the watering cycles. The non-recovery system needs to have a more precise timer so that watering cycles can be adjusted to insure that the plants get enough nutrient solution and the runoff is kept to a minimum.

The non-recovery system requires less maintenance due to the fact that the excess nutrient solution isn't recycled back into the reservoir, so the nutrient strength and pH of the reservoir will not vary. This means that you can fill the reservoir with pH adjusted nutrient solution and then forget it until you need to mix more. A recovery system can have large shifts in the pH and nutrient strength levels that require periodic checking and adjusting.

 
  • N.F.T.
(Nutrient Film Technique)


This is the kind of hydroponic system most people think of when they think about hydroponics. N.F.T. systems have a constant flow of nutrient solution so no timer required for the submersible pump. The nutrient solution is pumped into the growing tray (usually a tube) and flows over the roots of the plants, and then drains back into the reservoir.

There is usually no growing medium used other than air, which saves the expense of replacing the growing medium after every crop. Normally the plant is supported in a small plastic basket with the roots dangling into the nutrient solution.

N.F.T. systems are very susceptible to power outages and pump failures. The roots dry out very rapidly when the flow of nutrient solution is interrupted.
 

  • AEROPONIC


The aeroponic system is probably the most high-tech type of hydroponic gardening. Like the N.F.T. system above the growing medium is primarily air. The roots hang in the air and are misted with nutrient solution. The mistings are usually done every few minutes. Because the roots are exposed to the air like the N.F.T. system, the roots will dry out rapidly if the misting cycles are interrupted.

A timer controls the nutrient pump much like other types of hydroponic systems, except the aeroponic system needs a short cycle timer that runs the pump for a few seconds every couple of minutes.

Seledri Hidroponik Yuk Tanam Sendiri


https://www.youtube.com/watch?v=--LFViiCKlM
Seledri merupakan tanaman yang digunakan untuk berbagai macam keperluan di dapur untuk memasak, yuk tanam sendiri seledrinya biar hemat. Menanam seledri sangat mudah, bisa menggunakan tanah untuk medianya dan pupuk kandang untuk nutrisinya. 


Seledri juga bisa ditanam dengan sistem hidroponik, yaitu menanam tanpa menggunakan tanah sebagai medianya tetapi menggunakan air yang telah dicampur nutrisi sebagai makanannya. ABmix adalah nutrisi hidroponik yang banyak beredar dipasaran, di toko pupuk maupun dijual secara online


Video Tanaman Seledri Hidroponik

https://www.youtube.com/watch?v=--LFViiCKlM


Keyword :
Seledri Hidroponik
Budidaya Seledri
Menanam Seledri
Tanaman Seledri
Video Tanaman Seledri 
Tanaman Hidroponik


Budidaya Strawberry Hidroponik


 Video Strawberry Hidroponik
Hidroponik adalah cara budidaya tanpa media tanah yang tidak menyediakan unsur hara dan merupakan bagian dari pertanian pada kondisi lingkungan terkendali (Controlled Environment Agriculture) dalam rumah kaca atau rumah kasa. Menurut Wijayani dan Widodo (2005) dengan sistem hidroponik dapat diatur kondisi lingkungannya seperti suhu, kelembaban relatif dan intensitas cahaya, bahkan faktor curah hujan dapat dihilangkan dan serangan hama penyakit dapat diperkecil.

1. Perbanyakan Tanaman
 a. Perbanyakan dengan stolon
Stroberi diperbanyak secara vegetatif dengan menggunakan sulur atau stolon. Sulur adalah batang khusus yang timbul dari ketiak daun.  Sulur tumbuh sejajar dengan tanah dan membentuk tunas anakan pada setiap ruas. Pada setiap buku tunas anakan muncul akar dan tumbuh menjadi tanaman baru.  Dari setiap tanaman induk dapat diperoleh 20 pohon untuk dijadikan bibit.  Jika bibit telah tumbuh dan mempunyai 4-5 helai daun maka dapat dipindahkan ke bedengan dengan jarak tanam 15x15 cm.  Sebelum dipindahkan bibit harus diseleksi terlebih dahulu yaitu dipilih bibit yang sehat dan kuat.  Dua bulan kemudian sulur tersebut siap untuk dipindahkan ke kebun (Herlinayanti, 2003).

b. Perbanyakan Secara In Vitro
Stroberi termasuk salah satu tanaman yang mudah diperbanyak dengan teknik in vitro.  Dari satu pucuk meristem berukuran 0,5-0,7 mm dapat dihasilkan 15-20 pucuk perminggu.  Dari 15 pucuk yang diperoleh dapat dibagi menjadi 7-8 kelompok, masing-masing terdiri dari dua pucuk.  Dalam waktu 6-8 minggu kelompok baru akan kembali membentuk sejumlah pucuk.  Kemudian pucuk-pucuk tersebut kembali dipecah dalam beberapa kelompok hingga menghasilkan ribuan tanaman (Gunawan, 1996). 

 Video Strawberry Hidroponik


2. Persiapan tanam
Menurut Gunawan (2008) hal penting dalam sebelum melakukan penanaman dalam greenhouse adalah sterilisasi greenhouse. Sterilisasi dilakukan dengan tujuan untuk membersihkan seluruh greenhouse dari mikroorgnisme (telur/larva, virus, bakteri dan fungi) yang dapat merugikan tanaman. Ada beberapa bahan yang dapat digunakan dalam sterilisasi antara lain; lysol, formalin dan beberapa jenis pestisida, dengan cara:
Formalin 5% disemprotkan ke seluruh bagian greenhouse dengan konsentrasi 5 cc/liter air
Dalam waktu 4-5 hari setelah penyemprotan formalin disusul dengan penyemprotan pestisida (insektisida dan fungisida) dan diulang sampai 2-3 kali.
Sehari sebelum media tanam ditata, greenhouse disemprot dengan larutan lysol dengan konsentrasi 3-5 cc/ liter air.
Instalasi bak desinfektan kaki supaya penyakit tidak bisa dibawa ke dalam greenhouse.
Jika ditanam di dalam pot, media harus memiliki sifat poros, mudah merembeskan air dan unsur hara selalu tersedia (Anonymous, 2009a). Sedangkan tanaman stroberi yang ditanam dalam ruang tertutup (greenhouse) dapat menggunakan media rockwool atau arang sekam. Rockwool adalah batu gamping, yang dicampur dengan serat benang yang diolah pada suhu tinggi (600ยบ C).  Arang sekam berasal dari kulit padi yang dibakar.  Kedua media tanam tersebut dipakai untuk penanaman secara hidroponik.  Pada umumnya arang sekam lebih umum digunakan petani untuk penanaman stroberi kerena tidak mengikat hara.  Sehingga nutrisi yang diberikan kepada tanaman dapat dikontrol dan tidak merusak akar saat tanaman dipindahkan (Budiman dan Desi, 2005).

 Video Strawberry Hidroponik


3. Pemberian Nutrisi
Pada sistem budidaya hidroponik unsur hara esensial yang diperlukan tanaman disediakan dalam bentuk larutan/nutrisi. Larutan hara dibuat dengan cara melarutkan garam-garam pupuk dalam air. Berbagai garam jenis pupuk dapat digunakan untuk larutan hara (Anonymous, 2009b). Salah satu kesulitan didalam penyiapan larutan hara ini adalah belum diketahuinya dosis unsur hara yang optimal bagi pertumbuhan tanaman. Pada dosis yang terlalu rendah pengaruh larutan hara tidak nyata, sedangkan pada dosis yang terlalu tinggi dapat mengakibatkan tanaman mengalami plasmolisis, yaitu keluarnya cairan sel karena tertarik oleh larutan hara yang lebih pekat (Wijayani, 2000; Marschner, 1986).

Pemupukan dan Penyiraman (fertigasi) pada budidaya sistem hidroponik umumnya dilakukan secara bersamaan. Teknis fertigasi dapat dilakukan dengan manual atau sistem irigasi tetes (Drip irrigation system). Akan tetapi teknis fertigasi terbaik adalah dengan sistem irigasi tetes karena fertigasi dapat diberikan secara merata, meminimalisir tenaga kerja, menghemat waktu. Ada beberapa hal yang perlu diperhatikan dalam sistem irigasi tetes yaitu; kualitas air (sumber air) harus bersih dan bebas dari penyakit dan bahan kimia, kualitas nutrisi dengan komposisi hara harus dengan kebutuhan tanaman dan mempunyai kemampuan larut 100 %, waktu, volume dan frekuensi fertigasi dan jenis media yang digunakan (Gunawan, 2008).

4. Pengendalian Hama Penyakit
Pencegahan hama dan penyakit umumnya dapat dilakukan dengan menjaga kebersihan greenhouse, menanam bibit yang sehat, memberikan pupuk sesuai anjuran sehingga tanaman tumbuh sehat, melakukan pergiliran tanaman dengan tanaman bukan keluarga Rosaceae, memangkas bagian tanaman atau mencabut tanaman yang sakit dan menghancurkan tanaman terserang. Perbaikan drainase dapat menurunkan serangan penyakit (Anonymous, 2008b).

 Video Strawberry Hidroponik


5. Panen dan Pascapanen
Pemanenan buah stroberi dapat dilakukan 8 minggu setelah penanaman pada tanaman dari bibit stolon berperakaran baik.  Masa panen berlangsung 3-4 minggu, setiap minggu 2 kali pemanenan (Gunawan, 1996).  Berdasarkan penelitian yang dilakukan oleh Linardakis dan Manios (2005) stroberi yang ditanam pada sistem hidroponik dapat menghasilkan 734 gram buah per tanaman per tahun. Sedangkan penanaman di lahan terbuka yang hanya mencapai 450 gram per tanaman per tahun. Pemetikan buah stroberi yang akan dipasarkan untuk konsumsi harus disertakan kaliks, sedangkan untuk pengolahan tanpa kaliks (Gunawan, 1996).

Budidaya Semangka Hidroponik

 Video Semangka Hidroponik
Semangka Hidroponik? Mungkin anda tidak perna mengira, bahwa buah yang satu ini dapat ditanam dengan sistem hidroponik. Dengan system hydroponics anda tidak memerlukan tanah sebagai media tanamnya, berikut ini ulasan cara bagaimana budidaya semangka hidroponik

1. Penyiapan Media Tanam
Yang akan Kami gunakan merupakan sistem Aeroponik dengan menggunakan kultur terendam, yang perlu kita persiapkan adalah sebagai berikut :
a. Timer
b. Pipa paralon dan instalasinya (sesuai kebutuhan)
c. Torn penampung air (bisa pakai drum plastik)
d. Mesin pompa akuarium
e. Rangkaian penetralisir air (deionizer)
f. Stereoform (gabus)
g. Talang air

2. Penyiapan Tanam
a. Penyemaian

Siapkan dahulu tempat penyemaian yang berupa kapas telah dibasahi dengan air dan juga dilapisi kertas Koran yang di atas nampan plastik.
Benih bisa di beli di toko pertanian terdekat, lalu benih semangka yang akan disemaikan, direndam terlebih dulu di dalam air yang hangat yang dicampur ANTONIK dan diamkan selama 2 hingga 4 jam, kemudian benih semangka yang telah disemaikan pada tempat yang telah anda siapkan tadi, supaya tetap lembab lakukan juga penyemprotan dengan air  untuk tiap pagi dan juga sore hari. 
2 hingga 3 hari semai sudah tumbuh berupa kecambah kecil lalu pindahkan ke tempat lain pada media ABU SEKAM lembab supaya pertumbuhan kecambah menjadi lebih cepat, hanya dengan menyirami air tiap pagi serta sore hari , yakinkan bahwa abu sekam di dalam keadaan lembab.

 Video Semangka Hidroponik


b. Penyesuaian

Anda perlu menyiapkan tempat dan penyesuaian berupa nampan plastik yang  diberikan nutrisi
Setelah 8 hingga 10 hari penyemaian maka sebelum ditanam ke dalam media tanam maka pada benih yang sudah menjadi kecambah perlu  di lakukan penyesuaian dengan memberi nutrisi yang akan diberikan.

c. Penanaman

Mulailah dipindahkan ke dalam media tanam jika di tahap penyesuaian mulai tumbuh daun yang baru kira-kira pada hari ke 13 hingga 14.
Pada masa penanaman telah secara otomatis di sirkulasi nutrisi sesuai diatur dengan TIMER (disarankan anda menyetel timer pada setiap satu jam sekali selama lima belas menit yang dimulai dari pukul 00.00 s/d pukul 18.00).
Selanjutnya Perkiraan masa panen hingga dengan 60 hari yang dihitung sejak mulai tanam pada media tanam.
Apabila pada masa tanam terserang hama ataupun gangguan lainnya bisa diatasi dengan obat atau insektisida serta pestisida yang tersedia di toko pertanian.

Talas Bogor Talas Raksasa

Video Pohon Talas Raksasa
Pohon Talas adalah pohon yang masuk dalam kategori umbi-umbian. Talas yang paling terkenal adalah talas bogor karena bentuknya yang besar dari jenis talas yang lain. Pohon talas menghasilkan umbi yang kaya akan karbohidrat yang sangat tinggi dan juga kaya akan protein dan vitamin. Pohon talas tumbuh hampir diseluruh wilaya indonesia, dan tanaman ini tumbuh subur karena tidak membutuhkan syarat tertentu untuk pertumbuhannya. 
Menurut Danumiharja (1978) umbi, pelepah, dan daun talas dapat dimanfaatkan sebagai bahan pangan, obat, maupun pembungkus makanan, sedangkan daun, kulit dan ampas umbinya dapat pula dimanfaatkan sebagai pakan ternak. Selain dapat digunakan sebagai bahan pangan talas juga digunakan untuk minuman. Akar rimpangnya jika difermentasikan dan ditambah gula serta semacam jagung (Kaffir corn) dan air akan menjadi sejenis bir. Penggunaan talas sebagai obat tradisional adalah pembuatan bubur akar rimpang talas yang dipercaya sebagai obat encok. Selain itu cairan akar rimpang sebagai obat bisul, sementara getah daunnya sering digunakan untuk menghentikan pendarahan karena luka dan sebagai obat untuk bengkak. Pelepah dan tangkai daun yang dipanggang dapat dimanfaatkan untuk mengurangi gatal-gatal. Pelepah daun juga diyakini mampu mengobati gigitan kalajengking.  Dewasa ini usaha pengembangan pengolahan talas semakin berkembang, seperti talas rebus, talas goreng, keripik talas ataupun pengolahan lebih lanjut seperti tepung talas yang digunakan sebagai bahan baku soup talas, roti, dodol, dan cookies (Apriani 2007).

 Video Pohon Talas Raksasa

Klik disini utnuk melihat Pohon Talas Raksasa

Tomat Hidroponik dan Penggunaan POC Urine Kelinci

 Video Tomat Hidroponik
Video Tomat Hidroponik
Cara menanam Tomat Hidroponik sangat sederhana dan mudah, Selain Tomat buah-buah seperti Melon, Pare, Cabai juga bisa menggunakan Hidroponik. Kebutuhan nutrisi hidroponik nya pun disesuaikan dengan kebutuhan tanaman, misal tanaman sayuran daun membutuhkan nutrisi hidroponik yang memang khusus untuk tanaman sayuran daun, begitu juga dengan tanaman cabai juga membutuhkan nutrisi hidroponik khusus untuk cabai dan untuk tanaman melon, tomat juga membutuhkan nutrisi yang sesuai. Karena dalam video ini saya menggunakan nutrisi hidroponik sayuran daun untuk menanam tanaman tomat maka saya memberikan pupuk tambahan yaitu dengan menerapkan Pupuk Organik Cair dari fermentasi Urine Kelinci yang saya buat sendiri untuk menambah kebutuhan nutrisi tomat hidroponik. Untuk peng-aplikasiannya dengan dosis 10ml untuk 1 lt air dan disemprotkan kebawah daun setiap 2 hari sekali.

Berikut rincian dari tanaman tomat hidroponik ini :

Tomat Hidroponik
Sistem : guyur ponik, menggunakan toples bekas ( sosis so**ce ) yang tidak dilubangi bagian dasarnya, yang dilubangi bagian pinggir tengah jadi nutrisi akan tertampung setengah toples. satu kali sirang setiap hari. toples di bungkus polybag biar tidak lumutan.
Nutrisi : Hidroponik ABmix sayuran daun 10:10:1 ( masih belum punya TDS, dibaca : ngarep klo ada yg mau berbaik hati, heheh.... )
Doping : Pakai POC dari fermentasi urine kelinci, 10ml untuk 1lt air setiap 2 hari sekali di semprotkan kebawah daun.
Umur : Kurleb 10 HST ( udah agak besar ketika di pindah tanam )
Penampakan : 

 Video Tomat Hidroponik

Klik disini untuk melihat video Tomat Hidroponik dan Penggunaan POC Urine Kelinci

 Video Membuat Pupuk Urine Kelinci

Klik disini Untuk melihat video membuat Pupuk Organik Cair dari Urine Kelinci

Sawi Hidroponik Menggunakan Toples Bekas Part 3

Sawi Hidroponik Menggunakan Toples Bekas Part 3  - Sawi (Mustard Greens) merupakan sayuran yang digemari oleh setiap masyarakat, apalagi oleh pedagan mie dan bakso. Rasaya yang enak dan menyehatkan menjadi daya tariknya. Sawi merupakan tanaman sayuran yang bisa di tanam secara konvensiolan di tanah ataupun dengan sistem hidroponik. Biasanya kalau ditanam menggunakan sistem hidroponik, sawi akan tumbuh secara optimal karena unsur haranya terpenuhi dengan nutrisi hidroponik.
Penanaman sawi dengan sistem hiroponik pun cukup mudah, yaitu hanya memanfaatkan botol bekas, kita sudah bisa menanam sawi dengan sistem hiroponik.


 Video Sawi Hidroponik Dengan Toples Bekas

Klik disini untuk melihat video Sawi Hidroponik Menggunakan Toples Bekas Part 3 

 Video Sawi Hidroponik Dengan Toples Bekas

Klik disini untuk melihat video Sawi Hidroponik Menggunakan Toples Bekas Part 1

 Video Sawi Hidroponik Dengan Toples Bekas

Klik disini untuk  melihat video Sawi Hidroponik Menggunakan Toples Bekas Part 2


Sawi Hidroponik Menggunakan Toples Bekas Part 2

 Sawi Hidroponik

Sawi (Mustard Greens) merupakan sayuran yang digemari oleh setiap masyarakat, apalagi oleh pedagan mie dan bakso. Rasaya yang enak dan menyehatkan menjadi daya tariknya. Sawi merupakan tanaman sayuran yang bisa di tanam secara konvensiolan di tanah ataupun dengan sistem hidroponik. Biasanya kalau ditanam menggunakan sistem hidroponik, sawi akan tumbuh secara optimal karena unsur haranya terpenuhi dengan nutrisi hidroponik. Penanaman sawi dengan sistem hiroponik pun cukup mudah, yaitu hanya memanfaatkan botol bekas, kita sudah bisa menanam sawi dengan sistem hiroponik.

 Video Sawi Hidroponik

Klik disini untuk melihat video Sawi Hidroponik Menggunakan Toples Bekas Part 2

 Video Sawi Hidroponik Dengan Toples Bekas

Klik disini untuk melihat video Sawi Hidroponik Menggunakan Toples Bekas Part 3 

 Video Sawi Hidroponik Dengan Toples Bekas

Klik disini untuk melihat video Sawi Hidroponik Menggunakan Toples Bekas Part 1

Artikel Lainnya

Popular Posts